(I am putting this in the vegetable category because they are normally grown in a vegetable garden, even though technically speaking, they would be a fruit! But I don’t think that is the section many people would check to learn about them, am I right?)
Now that fall is here, the sunflowers have bloomed their beautiful flowers and now they are looking pretty sad. Their heads have drooped, their petals have dropped and if you aren’t quick about it, the birds will start to harvest the heads for you. Sunflower seeds are an excellent snack for both humans and livestock. We grow lots of sunflowers not only for their beauty but also to plant the following year and as an extra source of homegrown feed for our animals through the winter.
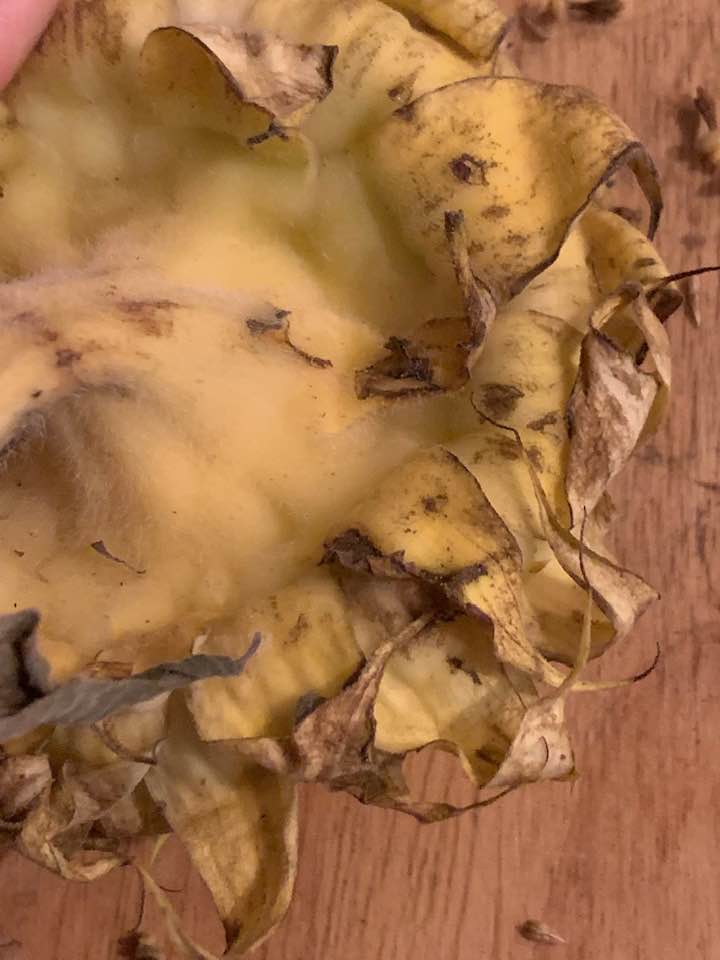
When are they ready? Look for:
Drooping head
Yellowing and browning on the back of the head
Outer petals brown, withered and falling off
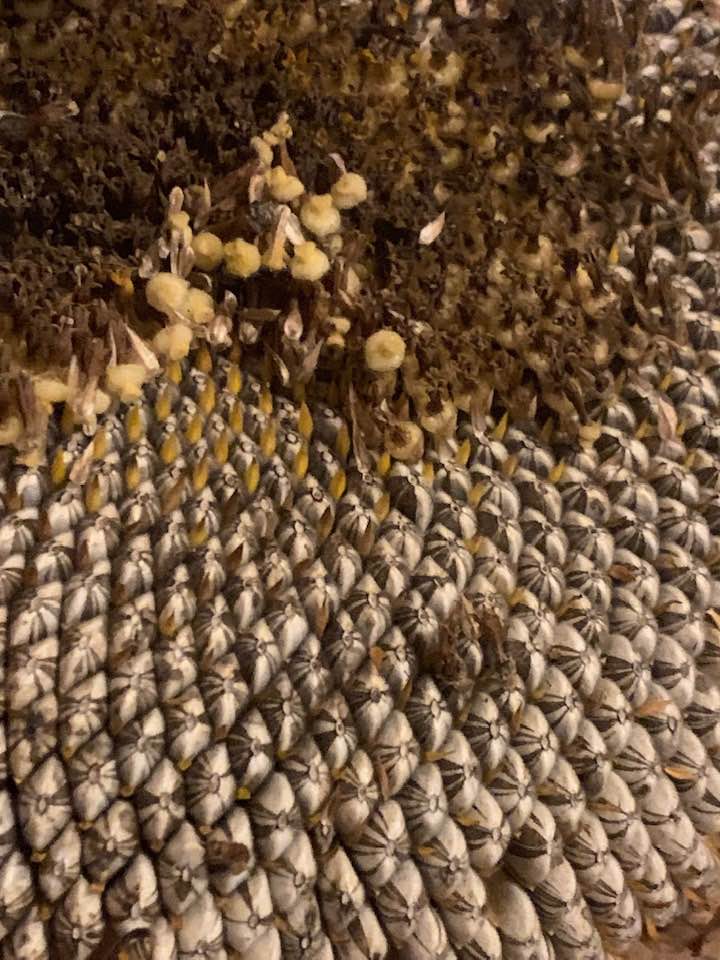
Lack of flower structure – if you rub your hand along the face of the sunflower, the disc florets, or small flowers that made the inner part of the sunflower yellow, should be brown and will rub right off.
Seeds are black and white striped and may be beginning to fall out. Immature seed is not striped yet. You will also notice a lo
How do you harvest? The important goal here, no matter which method you use, is to dry your seeds or they will mold and be unusable. They will not be dry coming off the stem unless the end of your summer has been hot and dry. There are two common ways – first, cut the heads with about a foot of stem or so left on it. Tie a few heads together and hang them from the rafters of your barn or garage to air dry. Or, you can remove the seeds right away from the head and lay them out in a flat layer, mixing daily, until they are dry.
When you are ready to remove the seeds from the head, be sure to remove all the inner ray florets. They usually rub off really easily. Then you start to rub out the seeds – once you get a few seeds popped loose the rest are pretty easy to remove.
Once the seeds are out, you will notice you probably have some extra debris from the head in with your seeds. If you spill the sunflower seeds – slowly – into another container while in front of a fan on low/medium, the debris should blow right out while the seeds fall into the bowl.
From here, you can brine or roast your sunflower seeds, but that is beyond the scope of this blog so I will encourage you to ask around or google how to eat and enjoy your seeds! Or you can save them for the following year, or feed them to your animals. Enjoy!
While the planting season may be over, there is still some work to be done before we can sit back and relax for the winter. One of these things might be doing something with left over seeds.
If you’re anything like me, you probably have some left over seeds from this past season. Maybe you’re wondering if they will “last” and germinate after so long. The good news is, Yes! Your seeds will carry over into the next season – and beyond – with proper storage. This is great news because now you can buy seeds off the clearance rack with confidence as stores look to get rid of their stock and save some money on next years planting.
There are a few things you should know when it comes to seed storage. In order for seeds to remain viable (produce strong seedlings) and have a good germination (sprouting) rate, you need to keep them dry (low humidity), cool, and in a dark place.
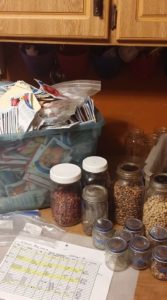
My favorite way to store seeds is in a glass jar with a lid that has a rubber seal. I store seeds right in the jar if I have enough, or I store the seeds in the original packet, right in the jar. It’s perfectly fine to store different varieties together in the some container. I have also put seed packets together by type and stored them in a ziplock bag. Don’t forget to label the container. Then, store in a dark place. Light will actually break down the seed coating, which opens the ability for bacteria and fungus to break in and destroy your seed.
Seeds prefer to stay cold, so you might even store your seeds right in your refrigerator or freezer. Suggested storage temps are under 50F. A handy tip I learned is that ideal storage is the total degrees F + the % of humidity should be under 100. If you aren’t sure about your humidity, you can buy a hygrometer that will measure the humidity in the air. I bought mine right on amazon and it serves a couple of purposes around here – i also keep track of the humidity in my egg incubators with it. Very handy.
Keep your seeds dry – both before you intend to store them, and during the storage process. You can buy desiccant packs to place in each storage jar to help remove moisture and ensure your seeds stay dry. Additionally you can buy silica gel at most craft stores and make your own – or even vaccuum seal your containers. Make sure your seed packets don’t get wet – once your seeds get wet, it’s very difficult to store them with success.
Germination Test: If you are questioning whether your seeds will sprout before taking the time to plant them in your soil, you can perform a germination test. Take a few seeds and place them on a moist paper towel. Fold it up and place inside a ziplock bag, then place the bag in a temperature controlled area that matches the best temp for germination for that plant. After the number of days suggested for germination, take a look and see how many sprouted. This will give you a good idea on whether they will sprout or not – but this won’t be a good indication on viability – often, viability will decrease before germination rates will, so even though the seed will sprout, it may not grow strong.
Fall is officially here. For many, that means the garden has finished producing, or is close to it. There are things we should do to winterize our garden, to protect the soil and reduce our workload come spring.
The three main jobs of winterizing include: removing plants and weeds from garden beds, adding compost, and covering your soil. There are other tasks that are important as well, such as thinning your strawberry beds, pruning brambles, cleaning/sharpening/oiling your tools, washing your plug trays, etc. We can talk about the little things in a future post, but tonight we will focus on readying the beds for planting next year and protecting the soil over the winter.
Removing plants and weeds: Remove all plants that are done producing for the year, as well as all weeds. You want to be sure to get the roots of those weeds, so they don’t come back! The roots of your vegetables are fine to stay, if you want to cut the plant at ground level. The roots will decompose and feed the microorganisms that make nutrients available to your plants. You can also remove them. If your garden is still producing, wait to remove everything – some cold hardy vegetables will withstand a light frost, extending the life of your garden for a bit of time after everything else has died. If you have a perennial bed full of strawberries, asparagus, etc. you certainly don’t want to remove those plants – focus on removing weeds. Take all of your garden residue, minus weeds that have gone to seed and any thistle, to the compost bin. If you are pulling diseased plants or those covered by pests, do not add those to the compost! Burn them or take them to another area to decompose far from your garden. Also, remove whatever produce may have been rotting in the beds.
Add Compost: This is especially important for raised beds. Over the growing season soil is lost – organic matter breaks down, or soil is clumped in roots of weeds pulled out, or sometimes it’s just compacted down and you aren’t left with much to grow plants in. Add compost back to your soil. It will help the integrity of your soil, reduce compaction, add nutrients back in, and provide a great place to plant in next season. You can make your own compost, or purchase it.
Cover Your Soil: Winter can be pretty harsh on bare-dirt beds. Winter snow can compact it, sunlight can bake it, and all the thaw/spring rains can leach nutrients from it. Weeds are also quick to grow and have some of the most hardy seeds around – they are the first thing to sprout in the spring. Having a cover will protect against all of these. You can plant a cover crop, such as clover (or, look into deer food plot seed mixes – they are generally mostly clover and might be more affordable than buying seed from a local grain mill). Cover crops work by covering your soil (after you have removed your plants and weeds) through the winter with a living cover, then you turn it under the following spring, before it goes to seed. Clover is especially nice because it will fix nitrogen in your soil. It does contain things that will make seeding difficult for a few weeks after turning it under (seeds probably won’t germinate), so plan to turn the soil under a few weeks before you intend to plant seed. This isn’t particularly helpful in a raised bed though, unless you can easily turn the soil yourself. Another fantastic option is a covering your soil with mulch. Finally, if you do not have access to either option, a tarp will work as well. While the tarp will not enhance your soil, it will protect it!
Of course, a perfectly cleaned up garden isn’t necessary – some beneficial bugs will hibernate in plant residue/stalks, so if you have a spot in your garden that is a little wild looking, your garden buddies will thank you.
Saving seed can be a truly enjoyable – and frugal – way of growing a garden… But there are some things to know. I often see well meaning gardeners suggest saving seed from storebought produce such as tomatoes, green peppers, green beans, squash, etc. While this seems like it would be a really great idea, it isn’t as simple as drying seed and planting it next year. Growing vegetables for saving seed is different than growing vegetables to eat, but they can be done together in the same garden with proper precautions – but the key here is that you should definitely grow them yourself.
Seed saving can seem a little complicated at first once you realize that many plants cross pollinate (resulting in seed that won’t grow true), and as a result, must be isolated during the flowering phase of growth (and in many cases, hand-pollinated by you). Saving seed from some vegetables requires fermentation, saving seed from others requires the vegetable be over-ripened on the vine, and yet other seeds destined for saving should be dried on the vine.
Here are some reasons against saving seed from grocery store purchased produce:
When you buy grocery store produce, you usually won’t know if the variety is hybrid or open pollinated; hybrid produce will not produce seed that will grow true. That means if you save seed from a hybrid tomato, it will not grow to be just like the one you saved seed from. It may sprout, but never grow fruit, but if it does grow fruit it likely will not be like the fruit you saved it from. You likely may not be able to find out the exact variety that was grown, either.
Consider also that most of our produce is brought in from far away, and growing conditions are very different all over the country. What grows for one farmer in California, won’t grow well for us here. I learned that the hard way trying to grow garlic from the store. Chances are good that on many things, we won’t even be able to determine the variety. If it is an open pollinated variety, you won’t know if it has been isolated to prevent cross pollination (farmers growing food for the market won’t isolate varieties as a general rule – their end goal is produce, not seed from that produce).
You want to be selective with what produce you save seed from. You don’t have that option to pick and choose from the best representations a garden has to offer when it comes to vegetables purchased from the store.
With all of the varieties you could grow, ask yourself if the tomato you bought from the store has the qualities you want in your own garden – is that tomato you want to save seed from really flavorful enough to chance saving seed from? you can grow varieties with more flavor, that (depending on variety) can be saved easily. You can also find other qualities in seeds that are important for you, your growing location, and your preferences. Produce grown commercially is grown to benefit the farmer, whether that may be ripening early, growing thicker skins to withstand shipping, uniform size, resistance or tolerance to certain things – these things may not be as important to us as a home gardener. But, taste and the opportunity to pick color, shape, or other neat options may be.
You can’t see the plant the produce came from. A key element to saving seed is being able to select produce that is growing true to type, that is growing from a plant that is growing true to type. What you save is what you grow. Without being able to see the parent plant and watch it’s growth and see its characteristics, you may be saving seed from a plant that has qualities you don’t want to encourage.
For best taste and nutrition, vegetables should stay on the vine as long as possible and harvested at the peak of ripeness – and for the few produce varieties that you can save seed from when they are ripe and ready to eat, you want the same end goal (ripe and fresh off the vine because that is when the seed is mature enough for saving). Produce that was picked before being ripe will not have seeds that are mature and your attempts at seed saving may not be successful, even with heirloom varieties. Any other produce used for seed saving must over-ripen on the vine or even dry on the vine before it’s seed is considered viable and ready to harvest – you’d never find that for sale in a grocery store.
I want to see you succeed at gardening! Seed packs can now be purchased for 25 cents to a buck per pack now, instead of the usual $2+. Set yourself up for success by using methods that have been established as true. If you still want to try saving seed from grocery store produce, by all means, give it a shot! But if you aren’t successful, please don’t let that break your gardening journey. Learn more about seed saving here on this post.
This is just an overview. I will get into the nitty-gritty of seed saving over time.
As a backyard grower, we can grow plants for flavor, texture, color and any other attributes that we want because we can grow many different varieties. We have many options as far as variety when it comes to ordering seeds from a seed company – but our options used to be huge. Each year, family heirlooms are lost forever as farmers and families plant the last seeds they have, then they cannot find anyone else to carry on the variety they have grown for so long. This is where seed saving comes in – when we are successful ourselves we can keep our favorites varieties from extinction. There are plenty of hybrids that are excellent for the backyard grower, too, but if you plan to save seed you can’t use them, because hybrid plants are essentially a crossbred plant, it takes two different parents to create that variety – your results of saving seed from hybrid produce will not grow true. As a side note, hybrid plants are not GM (genetically modified). To explain, that is another post. There is a lot of confusion surrounding hybrid and GMO seeds – you won’t find GMO seeds available to the backyard grower. As well, hybrid and GMO plants are two completely different methods.
Saving seed can be a work of love with a lot of planning thrown in. Not every type of fruit, vegetable or herb is easy to save and almost everything requires planning before you plant those seeds if you wish to save them! If you start by planting a hybrid variety (mixed breed), or your plants cross-pollinate with another variety, your saved seed won’t be true. You will have created, or continued, a hybrid variety of plant that cannot reliably produce the type of vegetable you are expecting – if it even grows at all. Sometimes, the plant will grow but won’t produce fruit. Luckily there are some pretty fool proof vegetables to save seed from and it doesn’t have to be complicated if you want to stay simple. Keeping the seed pure is pretty important though, so always use open pollinated or heirloom varieties of seeds if you wish to save seed from the plants you grow. That is the first step to a foolproof seed saving experience. If you want to produce your very own hybrids, that is certainly possible but beyond the scope of this article.
Tip: You can generally tell if a seed is a hybrid by it’s name – if it has an “F1” in front of it, it’s a hybrid. The description on the front or back will also tell you. If you’re still not sure, google has always been my friend when it comes to looking up varieties to see if they are hybrids or not!
So, how does one go about planting a garden with the intent to save some seed? Well, to prevent cross pollination, some plants need to be a certain distance apart, require taller plants (that they cannot cross with) planted in between them to act as a barrier, or require fine mesh bags over their blossoms while in bloom. You could also cage your plants or plant some vegetables so their blooms are staggered (and thus reduce the chance of cross pollination). Some plants don’t produce seed until the next growing season, so you will need to keep them alive through the winter. These are all things you will need to take into consideration when planning your garden. You may need to hand pollinate if you are using blossom bags to ensure purity. Another option is to stagger planting times so two or more varieties in the same family that you wish to save are not in bloom at the same time. Keep an eye on days to maturity and your growing season so you don’t end up with some plants not being mature until after your first frost! That is especially important if you are growing a warm weather crop that requires time to over ripen or dry on the vine.
You want to save seed only from healthy plants that are producing well and look for plants that display characteristics that are important to you in your climate – such as bolt resistance (perhaps you planted a row of greens and you notice a few are slow to bolt – pick those plants to save seed from if they are otherwise healthy), pest resistance, etc. You don’t want to select just the biggest and best vegetable because that will negatively affect your long term growing. Instead, choose vegetables from a wide selection of plants that are growing true to type and pick the best vegetables that are true to type (even if they are not the biggest) and growing on plants that are healthy and producing well. Of course, you will not want to save seed from plants that have been stunted, diseased, ravished by pests, or is otherwise compromised.
Your seeds, over time, can grow a type of immunity against disease and learn to grow – and grow well – in your soil conditions. In order to keep growing healthy, vigorous plants you need to save seed only from the best plants. That may mean sacrificing your best vegetables if you have only grown a few plants, if they are your best true-to-type examples. Luckily with some plants, like tomatoes, you can save seed when you pull them off the vine and prepare to eat them. However with others, such as cucumbers, squash, beans and peas (and more), you will need to let them over-ripen (past the point of being edible), or dry right on the vine.
This brings up another important point – you will want to grow enough plants to be able to BE selective and SEE which plants display characteristics you want. A few plants of this and that will not give you enough to be able to be that selective. If you only grow a few tomato plants, for example, and none of your tomatoes grow true to type, you will not want to save seed from any of those plants! Having a large selection is key. We need to keep in mind that vegetables are constantly changing depending on our growing conditions, weather, pests, disease, etc. What we save is what we will grow, and if we aren’t careful and choose vegetables to save seed from that are not the best representations of what we want to grow, your entire future crop will begin to go downhill and your options for selecting true to type seeds will dwindle.
Once you have figured out when and how to grow the plants, you need to learn when and how to save seed. Some plants will need to dry on the vine, and you save their seed once you pluck them from the vine. Others need to over-ripen several weeks past the point of being edible but should not be allowed to completely dry on the vine (seed will rot), some plants won’t produce seed until the next year (so you will need to make plans to either keep them protected over the winter if you live in a cold winter climate), or pull them and over winter them in your home(and learn how to do that, as different veggies vary in proper procedure). Seed saving procedures vary from plant to plant. Tomatoes seeds need to undergo a fermentation process to remove the gel covering, but the majority of seeds can easily be dried either in the pod (on the vine), or simply set out to air dry.
Having said all of that, my best advice to the new seed saver is this: Pick a single vegetable or two for starters. Pick the easiest vegetables that don’t require any fancy planning or techniques – tomatoes, beans and peas are the most popular. Do your own research on which varieties to plant. Then, do it. The next year, plant those seeds (mark them somehow so you can tell which is saved, and which seed was purchased if you plant both). Keep records through the growing season to track their performance. Save seed from the best fruits. And do it all over again. Each year, add one or two similar plants to the seed saving repertoire. After a few years you will have the hang of the easy stuff. Take it easy, go slow, and most importantly find the joy in growing more self sufficient.
A dibble board is a great tool to have around to help with quick and easy seed spacing. Spacing is important for optimal performance of your plants – if your plants are too close together they will compete with one another for nutrients and water – and pest/disease problems are more likely as well. However, proper spacing can take a bit of extra time and effort, depending on your garden layout, or you end up wasting seed later by thinning your seedlings to reach proper spacing. Who wants to waste seed or time? Sometimes both?
A dibble board is designed to reduce both time and waste in the garden. You can spend money buying one already made, or you can probably make one yourself with odds and ends you already have laying around the house and very basic skills with tools.
What have I tried in the past?
In years past I have broadcast some seeds over the beds and thin later (that equated to lots of seed waste and far too much time trying to thin), I figured time saved just getting seed in the ground would outweigh what it would take later, to thin. Later, I then broadcast in rows, so at least the seedlings would be in the same general area instead of all over. Still, lots of seed waste and time. My next attempt was to use a string tied from one end of the garden bed to the other, marking my rows. I tried to space my seeds along the string. In some cases, I tied knots at regular intervals along the string so I didn’t need to guess too badly at spacing. I have also used a ruler (I’m a perfectionist of sorts….) and tried to set a single seed or just a few in small holes I dug. The string was helpful to keep my rows straight, and I still use a string today to help guide my rows. Making an extra effort to ensure seed spacing and single/double seeds per hole did reduce seed loss by a lot – but the time spent seeding increased.
A few years ago I had an idea – create a board (or several) with pegs that could make holes in the ground and were evenly spaced so I could pop seeds in the holes and get my seeding done quickly. I put together a dibble board, and it has been a great tool that I have been using for years.
I am going to issue a caution here: I used scrap pieces, it’s not beautiful, there could be a better way to go about doing this…. BUT it’s functional and has worked for the past three seasons. That’s a win in my book.
So here is how I did it:
I used a 2×4, a dowel rod (probably 1 inch? It was in the burn pile attached to something so I’m not sure on diameter, but diameter really isn’t important here) and screws. I cut the dowel rod in short segments – maybe an inch but it could (and probably should) be shorter to an average depth of the seeds you plant. Considering very few direct sown seeds are planted at an inch depth, this was one of my mistakes – but I can reduce how far I push this into the dirt and I can control how much soil I fill the holes in with, so I am mindful of proper depth. Then I screwed the dower rods on the bottom of a 2×4 that was cut to the width of my garden. I used a yardstick and measured the distance I wanted the pegs to be. I left a margin of about 6 inches on either side of the board so I wasn’t planting right up to the edge of my garden bed (plant overhang would likely get damaged as I cut my garden aisles, so I felt 6 inches was a good starting point. My beds are about 4 ft. wide, so that is about how long my board is.
After attaching pegs to one side, I then picked a different length and did the other side. I have 2, 4, 6, 12, 18 and 24 inch spacing, two different spacing per board.
Here is how I use it:
I have found this can only be used on bare dirt, so if you have mulched beds your experience may vary. You will have to push the mulch aside to get to the dirt layer (ideally on an already established bed). If your bed has been sitting for a while, your soil hopefully won’t be too compact to use it, a simple clearing of the mulch and pressing the board in the area you cleared will hopefully work. If not, loosen the top layer of the soil somehow – using a hoe, pitchfork, or some other such tool. You don’t want t turn over the whole bed, or even go deep, just deep enough to leave an indentation from the pegs.
I till some of my beds to break the top layer of soil up a bit. Then I get down on my knees with my hands at either end of the board, and using the board with the narrow side touching the dirt, I move the board back and forth to smooth the surface of my bed. if I don’t do this, there will be areas of the garden bed that the pegs don’t’ reach because the soil is uneven.
Once the soil is smooth, I take my board and, with the pegs on the bottom of the board, stamp it into the ground.
I created the dibble board originally to be used straight across the width of the bed (which is why I had included the margins on either end), but in order to use it, that required that I kneel and walk in the garden bed, compressing the soil. I later changed up how I used it by using it in segments across the bed, smoothing soil from top to bottom if I am kneeling in the aisle between beds. I then stamp the dibble board in the dirt parallel to the length of the garden bed starting at the side furthest from me, then stamp additional rows coming back to the aisle I am kneeling in, depending on row spacing. I might place some sticks in the dirt to mark my rows at the beginning of the bed, but I can continue to stamp rows further down the bed as I work in segments as wide as my board, continually clearing, then stamping. I can see where the rows were previously stamped, and continue working off of that as far as row spacing.
I ended up looking online after I made these to see if there was anything like it, and I saw dibbles (also made one of those – love it for pricking out seedlings from my plug trays) and wider boards instead of a 2×4. I think those would be great to use, if they lined up well with the size of your garden bed. The nice thing about the dibble board I put together is that you can cut the 2×4 to whatever length you need – whether it’s the width of your garden bed or an armspan that is comfortable for you. Whatever you do, don’t make it too big to use comfortably.
Have you made something similar? I’d love to see it!
As a gardener, I am constantly thinking ahead. My thoughts never stop at the current years garden, I try to think years ahead. And every summer/fall I feel like I am thinking more about the next years garden than I am about my current garden. This is because successful gardening benefits from planning and preparation. I am going to share with you an idea to easily make permanent garden beds without having to dig or rototill. This will create a bed that you won’t need to rototill, but thanks to earthworms and other creepy-crawlies underground, your soil won’t need it.
A few years ago I started making a big change toward no-dig beds in my garden. I usually have about 60 beds, but I change the nonpermanent bed structure around from year to year, but I generally have around 60 beds and a few bigger plots for corn and squash. Because of how many beds I have, and the fact that my garden is tended to be me and my children, going 100% no till is a process. I don’t have a tractor, or superhuman strength, but each year more and more beds get converted and it will be a work in progress for another couple of years. If I can do this while homeschooling eight children, it gives me hope that anyone can get a bed or two put together without having to rent any equipment or spend hours you may not have. I don’t even use a tiller to make my beds in the fall anymore!
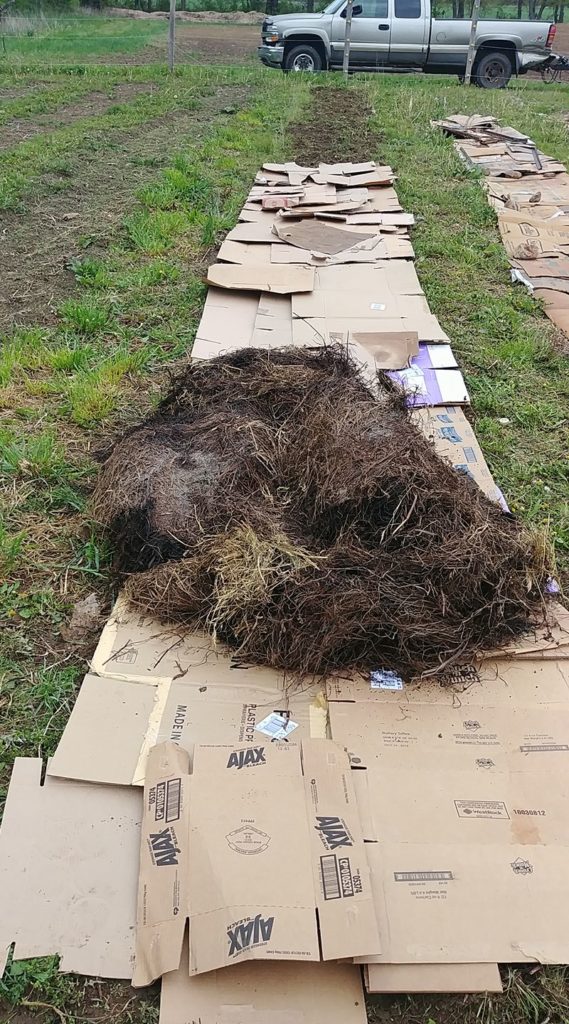
All you need is cardboard, compost, and mulch. And if you start your bed now, it should be ready to plant into in the spring without much prep work at all. I have spent many a spring tilling, pulling weeds, and spending so much time preparing beds when I should be sowing seed and transplanting. Switching to no till beds has been a big time saver in the spring, then I can put time into them to refresh them later in the season.
If you are frugal-minded (I am, so I thought I’d share some ideas to keep costs low), you can save cardboard from your household, ask friends to save , or ask local stores if you can take some of the cardboard they are discarding. I have a store locally that will let me take all the cardboard I want! Stay away from boxes that have been covered in wax or a glossy finish. As far as compost, many farms are willing to just give it away if you have a way to haul it. Some will let you drop a trailer at their farm and they will fill it when they clean their barn, others may have a tractor that they can load their manure pile into. If you are really lucky, they may have manure that has already aged and is just sitting around! If you have rabbits, their manure is like garden gold – it doesn’t require aging and it does lovely things to your garden. As far as mulch, if you have an accessible spot you might be able to talk your local tree service into dropping a load of tree mulch in your driveway or backyard, maybe a friend will have a spoiled bale of straw, maybe you can save newspaper and ask that your friends do, too. Here are some mulch ideas.
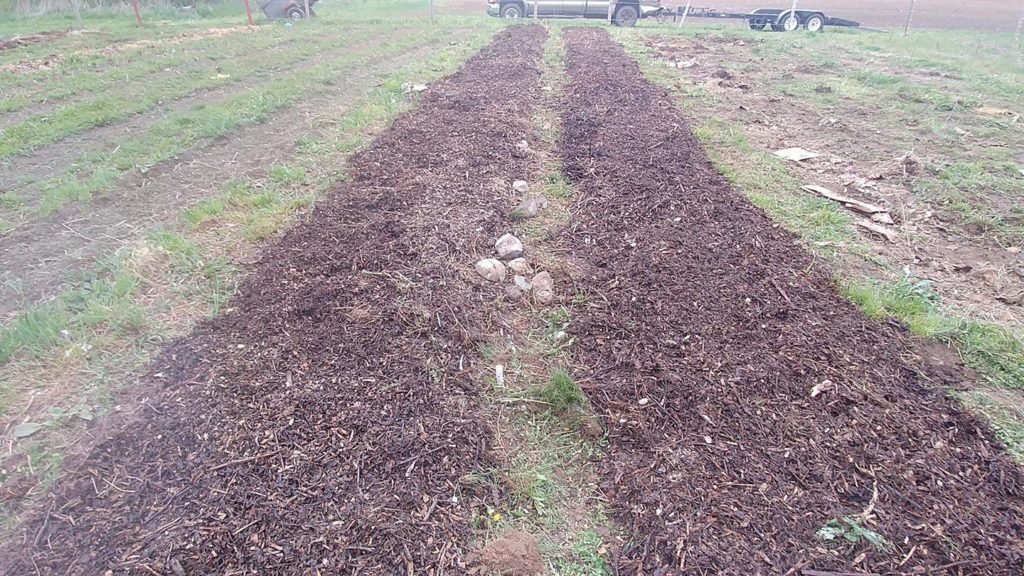
I am going to assume you know exactly where you want to place your bed. I will write up a post about garden planning soon. You want to be sure your spot has enough sunlight, fertile soil and good drainage before placing a bed on it. Then cut the grass nice a low, lay cardboard down completely covering your bed, then pile on compost. Depending on the time of year you are doing this, mulch (if you choose to use it) can be put on right away or wait – I prefer to make new beds in the fall, or at least get the cardboard and compost on. Then, after a good frost I will put the mulch on (though, admittedly, I have put mulch on any time of year just because if I have the time, I need to take it… but my preference for topping with mulch is after a good frost). That is the basic idea.
Some people prefer to rototill the soil before placing cardboard on. Some people prefer to dig out the center and place old/moldy straw or hay in the center before piling dirt back on. There are a variety of ways to go about this.
You can do rows or your entire garden. I do rows, about 50ft long, about 4ft wide and I leave a small path to walk on and get a wheelbarrow down. to keep the paths walkable, I use a weedwacker and go over the grass once a week in my aisles.
As far as upkeep, each year I place a new layer (though not as thick) of compost on at least once a year, if not a couple of times depending on if the crop I am growing is a heavy feeder or not. I also refresh the mulch once a year with a few inches of wood chips that have aged a year, or moldy hay.
It’s now September in my Concord, MI garden. I thought I’d ramble about our August garden happenings.
We have had relatively few pest problems since we butchered our meat birds. This year’s batch of meat birds were very creative in escaping from their fenced in pen (located in my garden; they rotate to different spots each year to aid in fertilizing) and they ate almost all of my spring garden. This year, they were my biggest pests!
It doesn’t help that this years spring was extremely wet, which made being able to do much in the garden a tough job on its own. We have had our usual run in with Japanese beetles, hornworms, squash bugs, and cabbage moths. We have had some hot periods this summer, but nothing too over the top. I try to keep track of all of these things in my garden planner, which helps me keep track of problems we have had, and successful methods of handling them. I took a walk through my garden and made note of a few things and started to think about crop rotation and where I would like to move some things.
I was happily surprised last month taking a walk through the garden to discover I actually did have cabbage growing (I thought the meat birds got them all), I had more zucchini growing than I realized (some zucchini seeds found their way into another squash bed that I wasn’t checking on a daily basis because the squash takes a lot longer to mature over there). Our church had a massive garage sale for missions and brought all of their cardboard boxes over to me. I use cardboard like crazy in the garden to help keep weeds at bay, so I happily accepted them this year and last. A tree service was doing a lot of local work over the past couple of weeks and we became their drop spot for all the trucks they had working in the area. They were very grateful to have an easy spot to drop unlimited loads (yes, I did tell them they can drop it all here) and I was simply giddy to have so much mulch. We are in the process of turning many of my in-ground beds into no-till beds and we use a lot of mulch. I am very, very thankful!
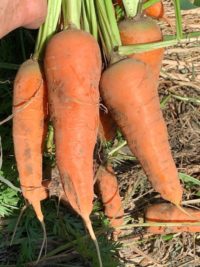
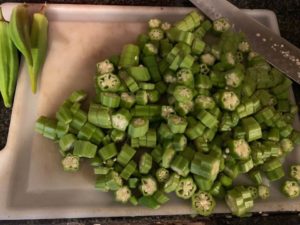
This month I have harvested my onions (red, white and yellow), pulled some carrots, enjoyed some cherry tomatoes, continued to harvest broccoli (after the head forms and you harvest it, don’t pull the whole plant – smaller offshoots will develop – they are like pre-cut florets! Perfect size to pick and eat without having to cut smaller), cabbage, celery, acorn squash, zucchini, summer squash, okra, spaghetti squash, and herbs. The bigger tomatoes just started to turn towards the end of the month and I have begun processing them. I’m sure I am forgetting something, I always do.
I am anxiously awaiting another round of green beans, the winter squash are still growing. On the to -do list include harvesting herbs to dehydrate for use over the winter, harvesting more celery for the freezer, freezing zucchini, and turning tomatoes into various canned forms. Tomatoes are one of those things that we do a whole lot of. Last year I grew over 600 plants. After canning, eating fresh (I have 8 kids, most of them love snacking on tomatoes), and sharing with others, we canned a grand total of 495 jars of various tomato products alone. It was awesome. This year, thanks to the cold, wet weather my transplants didn’t do as well as I had hoped they would, but we do have a few hundred plants out there looking beautiful.
Fall garden prep will be going here in a bit. This year really got away from me with the late spring planting and the pile up of farm projects that resulted. Last year my garden had so much going on, and I put it all in 8-9 months pregnant and kept it in the best shape of its life despite a newborn. It was just beautiful! This year that newborn is mobile and kids are busier and having to try to plan my time in the garden around kids and all the wet weather really slowed me down. I am rather surprised, but sometimes that happens. Mama said there’d be days like this… I am convinced next year will be better, and we started our homeschool year back a couple of weeks ago with the intent of being done by or in April so that I have time to get my garden in. Because I have convinced myself it won’t be so wet. When the ground is as wet as it was, you really don’t want to be out there doing projects and planting because it will compress the soil, leading to further problems later.
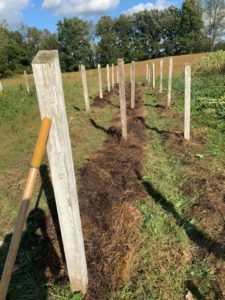
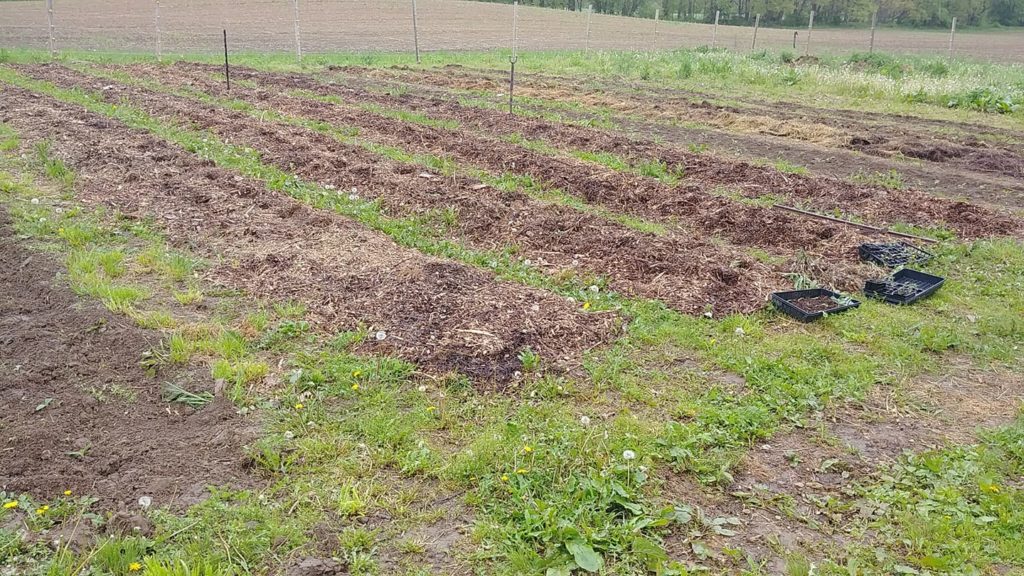
One area of new changes in the garden is the side closest to the road. We call that the Roadside Garden. Originally my garden was divided by fence into three sections. The first garden was what is now the spring garden. I added on to that to the north – the Roadside Garden, then I added to the south of the spring garden and we call that the Summer Garden. In the Roadside Garden I am building some no-till beds, completely redid the raspberry trellis (and now I need new raspberries to go there, I pulled the old ones out and started completely over), and am trying to solararize a small plot for next years corn. We had meat birds in this area this year, so this spot of the garden had a rest and manure, and the meat birds area has been moved to a new area for next year. There is still plenty of work to be done, but in the area of the new beds I cut the grass low, laid cardboard, topped with a few inches of compost, and now I am using my favorite hoe to remove the little weeds that are starting to pop up. After a good frost I plan to lay mulch and -ideally- these beds will be ready to go with little to no prep work next season. The cardboard should break down and there should be plenty of earthworms and good garden buddies crawling around in the bed, and the mulch should suppress weeds.
September should continue to be a good harvesting month, hopefully I will finish the new-till beds in the Roadside Garden and begin the process of clearing and refreshing beds for next year as the harvest is collected.
What have you been doing in your garden?? What are you harvesting?
Many people are surprised to learn that we can grow Okra right here in Michigan. I have been growing it for years and it never fails to be a point of interest during conversation. Okra is very easy to grow here, and quite prolific! We enjoy it sauteed in butter as a side dish, but I grow it primarily for our gumbo!
What you should know: Okra doesn’t like to be kept wet, and doesn’t need to be watered very frequently. Plan to place them in an area of your garden that is on the dry side and in full sun. Add some compost to their area ahead of planting, or plan to plant in an area that a nitrogen-fixing crop grew previously (such as legumes). Soil temperature for both starting seeds and transplanting into are very important, as I will share with you in a moment.
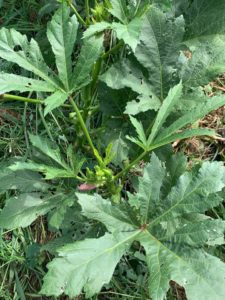
Okra plant
Seed will germinate in 5-10 days, and you can soak your seeds overnight in water to help them germinate quicker. Okra likes hot weather and that is no different for the soil the seed spouts in – plan for that to be at least 75F, but warmer is preferable. My MSU Training Manual tells me it will germinate from 60-105F! That’s pretty warm. Of course, with lower temperatures it will take longer, though germination will eventually happen.
You can direct sow the seed here in Michigan, but you will get a better harvest by giving it a head start as a transplant, and start seed indoors about 4-6 weeks before our last frost and plan to transplant outdoors about four weeks after our last frost. Direct seed about 4 weeks after our last frost also, to allow the soil to warm up and for our weather pattern to be on the warmer side.
If you have seeded in plug trays, you will need to “pot up” your seedlings to a larger container when they are about 2-4 inches tall. This is necessary for proper root growth.
Plant the seed 1/2 – 1 inch deep, one per cell in a plug tray or if planting outdoors you will aim for a seed every 6 inches or so, once seeds have germinated, thin to one every 12 inches. Okra needs 55-65 days of warm weather to produce. Days to harvest are 40-70 from transplant, 80-90 days from seed. Space rows 24-36 inches.
Maintenance: Okra plants will grow to a height of 2-6ft. depending on variety. When the plants are about 4 inches tall, mulch to retain water and suppress weeds. Side dress with compost every 3-4 weeks.
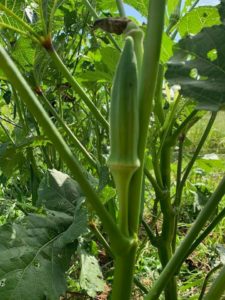
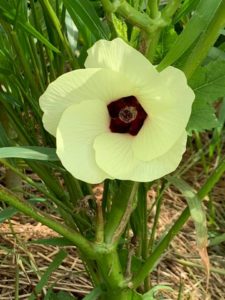
Harvesting: Okra should be harvested when the pods are 2-4 inches long, generally about 5 days from flowering. If you let the pods continue to grow they will become tough and fibrous, and inedible. Pods that are not picked will cause the plant to slow down or stop producing. Pick pods every 3 days or so. While our climate won’t allow for it, okra can be picked for a year if pods are continuously removed.
To Use: Refrigerate okra after harvest. It will last about a week in the fridge. Okra freezes very well, in fact that is the only way we preserve it. You can also pickle okra.
If you did not use your whole seed packet, store it in a dry, cool location and use it again the next year – okra seeds are viable 4-5 years depending on storage conditions.
As a frugal gardener, my gardening tools don’t go much beyond shovels, trowels and rakes. But one year my husband saw this tool in our local hardware store and bought it for me on a whim, thinking maybe I could use it. He had no idea how it worked, if I’d like it, or how much it would change my life. Maybe I am being a little over dramatic, but seriously this tool cuts down HOURS in the garden when I am weeding bare-dirt beds. My kids enjoy using it. Weeding is almost pleasant even for the most anti-weeder.
Meet the Stirrup Hoe.
The type of stirrup hoe I use is a Hula Hoe. It has other names, Action Hoe is another. It comes in a short version, as I have pictured above and here on the side, and a long handled tool with a bigger hoe end that you use standing up. I have both, and I prefer the smaller version because – for me – it’s easier to use. It will give you a great arm workout regardless of which one you use, but I feel like I have more control when I am gardening on my hands and knees so I prefer the shorter tool. The shorter tool cost about $16 or so, and the long handled one was $25 or so. Check your local hardware stores, but if you can’t find them locally I bet you could find them on Amazon.
How to use it:
The tool can be used in a forward, backward, or forward and backward direction depending on your needs. The head is fixed on an angle with some flexion, and the bottom part of the tool that comes in contact with the dirt acts as a blade, slicing weeds apart. Depending on how deep you go, it may pull some smaller weeds out, or slice them apart under the soil line.
The blade is intended to have some wiggle to it, because depending on the direction that you pull it, it will move so the blade is constantly digging into the ground no matter if you are pushing or pulling. If you use more upper body strength, you can dig the hula hoe in the ground and use it to loosen up your soil around your plants. It’s excellent to run over your beds every couple days to slice off all those baby weeds before they ever become a problem in your garden. It’s ease of use cuts off hours of tedious hand-pulling of weeds. It’s narrow enough to run through your rows and you can get right up close and personal with your vegetable plants, slicing off weeds without ever disrupting the root system. When you hand-pull weeds that have taken deep root, it can mess with the root system of the plants you want in your garden bed, leading to stress and shock, which can lead to death of your plants!
Where it won’t work:
Stirrup hoes won’t work well in mulched beds, on wet soil, or with tall weeds. Hand pull the tall weeds and then maintain your beds with the hula hoe – simply finding a few minutes every couple or so days to run it over the soil and remove all the tiny baby weeds will save you so much hassle later on.
Have you ever tried a stirrup hoe?? What do you think about them? You know, if you are local and want to come try it before buying it, let me know! I would be happy to let you test drive one before making the purchase.