I must say this is one of the better meals I make. Depending on our guests, I make this a guest dinner. I used to make these to send to neighbors (when we had some within walking distance… haha), just ‘cuz, and I make these for families who need a meal. I make and freeze these so that instead of ordering pizza on an hectic night, we can preheat the oven and have these within 20 minutes. If you like pizza, you will love these. Anyone I have made them for has raved and raved over.
I have always made these with homemade dough. Letting the dough rise is not necessary for these. My husband helped me formulate the recipe and the method once he had helped a friend out in his store. The store also made and sold pizzas and calzones in the back corner and he filled in whenever they were short. These are just the best!
I will be writing an article on baking bread and working with yeast doughs soon, because knowledge is power and you can make your calzones even better with some basic yeast bread knowledge. I am not going to get into too many details here, but will post a link as soon as I have a tutorial put up.
The nice thing about these calzones is that they are pretty easy, and you can customize them to suit all the different tastes in your family. Have a child who doesn’t like pepperoni? Fine! Do your boys like a variety of meats? Ok! Is someone a veggie lover? Someone else love mushrooms when no one else does? Instead of having to agree on whole pizzas that please the whole family and compromise, this is the one time that being a short-order cook isn’t a huge deal and everyone can be happy. Let your kids take care of their own toppings – if they are able, let them slice the onions, saute the peppers, brown the beef or sausage, etc. You can even set all the ingredients out on a table once they have helped put them together and let everyone top their own calzones. This is great fun to kids!
I love baking mine in the wood stove. I flour the bottoms of the calzones really well and am sure the dough is sealed well. I set them right inside the firebox with a medium-low fire going on one side and hot coals laying on the other side. The skillet goes over the hot coals. I watch it like a hawk because the calzones will brown quickly, and turn it a quarter turn in the skillet so all the sides brown evenly. You can bake them in the oven just as well until the tops are brown to your liking. Then we butter the tops (sometimes make garlic butter, spreading fresh minced garlic in soft butter), sprinkle some freshly grated parmesan cheese and some dry parsley, let it cool a bit so the the cheese doesn’t drip out all at once, then enjoy.
Ingredients:
- Bread dough – I usually make one batch per meal. Considering my kiddo’s are still young and we can stuff the calzones with many fillings to fill them up, one batch of dough can make 8 small calzones. It can also make two huge calzones. Or four medium.
- Mozzarella Cheese
- Toppings – pepperoni, browned beef and/or sausage, mushrooms, onions, green peppers, ham, pineapple, etc, etc, etc.
- Pizza Sauce
- Finishing touches: butter, garlic powder, parsley, parmesan cheese, etc.
Method:
- Depending on your method of cooking, prepare your wood stove or normal oven. Preheat an oven to 400F.
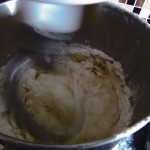
- Prepare your dough. I am going to refer to the dough I use all the time for calzones, linked above. Start by letting your yeast rest in lukewarm water with sugar. Once this has foamed up, you may add flour, vegetable oil, salt and begin kneading. Once your dough has formed a ball and is no longer sticking to your hands, knead it for about 5 minutes.
- You want the dough to still be a little tacky, but not so sticky that it sticks to your hands after you handle it. If it’s too dry, it will not rise as nicely and will be dense and crusty. If it’s too wet, it will stick to everything including your baking sheet or skillet. I have a picture below showing that if I stick my finger in it, it will still stick to my finger a bit. In another picture I smooshed my hand into it (you can see the hand imprint) but in either case, dough does not pull away from the ball to stick to my hand when I pull it completely away.
- Divide your dough into however many calzones you want to make. Roll the balls thin, then roll them out pretty thin if you are cooking in the skillet inside a firebox, but a little thicker is alright for the oven. The firebox of a wood stove will cook the calzones quickly, so you don’t want a thick layer of dough or it will not cook through before it starts to burn on top. To learn how I made calzones in my firebox, read this.
- I will have the following steps after these pictures.
-
- Still sticky
-
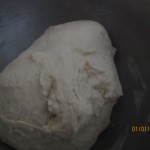
- No longer sticky – it picked up all the bits on the side of the bowl
-
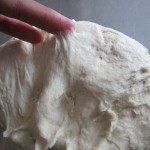
- You still want a certain bit of sticky-ness
-
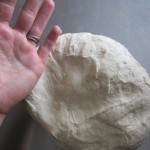
- But not so sticky it leaves the dough and sticks on your hands
-
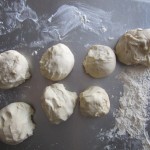
- Divide your dough into balls
-

- Roll them smooth
-
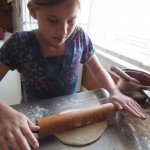
- Roll them out
-
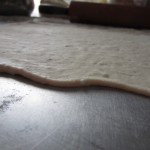
- You want them quite thin if you are cooking in a wood stove, though a bit thicker will work in the oven because it will be in longer without worry of burning.
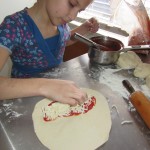
- Now we begin to prepare the calzones. Once rolled thin in the shape of a circle or oval, apply sauce as thick as you like to one half of your calzone. keeping it at least an inch away from the edge. If you put sauce too close to the edge, it won’t seal properly. An unsealed calzone will leak cheese all over your baking pan leaving you with a shell of bread.
- Then put your meat and additional toppings on. Cheese goes on last.
- Fold the other end of the calzone over your toppings and press around the edge to start sealing the calzone.
- We then roll and squeeze the edge of the calzone all the way around to seal completely.
- Prepare your oven – either lay coals flat in your firebox with a medium-low fire going in one half and set out an UNGREASED cast iron skillet (then flour the bottom of the calzone REALLY WELL – any moisture will burn very quickly, causing your calzone to burn on the bottom), or grease a baking sheet for the oven. Calzones do NOT need to be floured on the baking sheet.
- Bake in a 400F oven for 10-13 minutes or so, until the tops are golden brown to your liking. In a wood stove your calzones will cook quick – maybe 3-4 minutes but watch them the whole time and turn a quarter turn as you notice the calzone starting to brown.
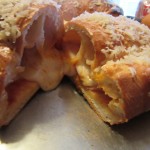
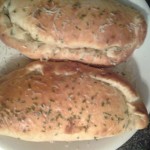
- Once removed from the oven, butter the tops and sprinkle on your finishing touches – garlic powder, garlic butter, parmesan cheese, parsley, etc.
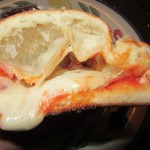
- Let cool for a while because if they are very hot and you cut them open, all the cheese and everything will leak out. Not cool.
-
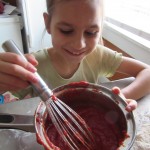
- This cute munchkin made the sauce
-

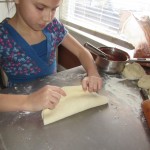
- This sweetie is helping to make the calzones
-
- Top half of your calzone
-
- Fold the top over
-
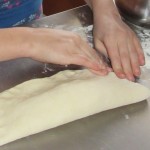
- Squeeze the edges
-
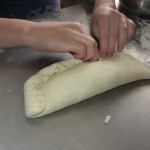
- Then roll the edges and squeeze them in