
I recently made kielbasa and smoked sausage and thought I would share with you the recipes I used and the process. I will share with you my breakfast sausage links and bulk sausage you can use ground or make into patties in another post. Here, I will focus on smoked sausage and fresh or smoked kielbasa links.
My next projects will be brats, breakfast links, summer sausage, pepperoni and hot dogs. We don’t eat a ton of sausage products, but I feel that the effort and time that goes into making these is worth it because I know exactly what is going into our bodies – and the savings are worth it as well. While we may not eat sausage often, when we do eat it, we cook a bit more than your average family because there are so many of us. I no longer have to cringe when I look at sausage and see an ingredient list that includes 13 or more ingredients vs. my recipe that might include 7 or nine – but I can pronounce each ingredient, they are basic and I don’t include MSG. Yes, my smoked sausage does include a cure for safety reasons. But if we are going to eat sausage (and my husband enjoys it on occasion, so we eat sausage!) I would much rather it be something I have made myself.
You will need some specialized equipment for this task. A meat grinder, unless your meat is already ground up (you could always ask your butcher to grind it), a sausage stuffer, something to hang your sausage on until it dries (a rack, hooks, drying rack for baked goods, etc.) and a smoker (only necessary if you want smoked sausage). I have a kitchenaid mixer, so I have already purchased the meat grinder attachment and the sausage stuffer attachment, both of which I am very pleased with.
If you are interested in these attachments and live locally, I would be more than happy to show you how to make sausage and let you try out my equipment before deciding to purchase them yourself. I will also include my affiliate links directly to these products at the end of this article if you are interested in purchasing them and would like to support my blog in the process.
You will also need a few special ingredients not commonly found in typical grocery stores: pig fat, meat cure (sodium nitrate), and hog casings.
I did a little bit of research on whether or not the cure was absolutely necessary for fresh kielbasa, if I was not going to smoke it. We like fresh kielbasa, simmered until cooked, for our holiday meals. Then we enjoy smoked sausage any other time. So I didn’t plan on smoking all the sausage I made and wanted to avoid preservatives like the meat cure if possible. From what I could understand, the cure isn’t necessary if you take it from the stuffer straight to the freezer or fridge without sitting out for long periods. If you will be freezing or cooking your sausage immediately after stuffing, the cure may not be necessary. You absolutely need it if you will be smoking your sausage because the meat temperature will remain in the danger zone for gross things to grow for far too long. If you are unsure, I urge you to research the matter yourself if you are wondering if you can avoid adding the cure. For breakfast sausage, a cure is not necessary because you aren’t hanging or smoking anything.
Now the next question is where do you find the cure? You want something like Sure Cure or Instacure #1. It’s not commonly found on store shelves but if you know a butcher, they may be willing to sell some from their stock to you. Two meat shops near me will sell the cure to their customers based on the pounds of meat we will be using, but its not something they would put on the shelf because they aren’t a grocery store – and grocery stores don’t usually have the demand for a meat cure and won’t stock it. Call your local butcher and ask. If you cannot find the cure, you can find it on Amazon here.
Sausage casings are another ingredient you need. These are most often hog casings. Again, call your local butcher. Many times they don’t have the casings taking up space in their meat counters because they sell to the general public who wants the product already stuffed, but if they make their own sausage, they have casings. They may be willing to sell you some from their own stock. For sausage, brats, kielbasa, you want hog casings. Different casings are better suited for different purposes. If you cannot find them locally, you can find them on Amazon.
Before you begin, prepare your casings. Rinse them off. You will soak your desired amount in warm water for about 30 minutes to an hour before using. Approximately 1 pound of meat will yield two foot of sausage. Once soaked, hold one end up to your sink and create a bubble of water inside your casing. You are going to run that bubble of water through the length of casing you are using to check for leaks. Keeping a firm hold with both hands on the casing, raise your left hand so the bubble starts traveling down the casing until it meets your right hand. If that section of casing checks out fine, make a loose loop with it in your left hand and pull another section free to let the water travel through. Do this until the water has gone through the entire casing. If there are any big leaks, you will want to cut your casing and use each section individually. Once you have ran water through the whole casing, set the casing back in fresh water until you are ready to use it.
Another very important step is to make sure your meat and your stuffer are COLD. Put your stuffer attachment or parts and pieces in the freezer to get good and cold before you use it. Let your meat chill after you mix the seasonings in. The colder the meat is, the easier it will run through your stuffer. Warm meat will gum up and become sticky and it is a huge pain to deal with. Ask me how I know. I almost fed the entire first batch of sausage to the dogs I got so frustrated (haha). If you find your meat becomes warm as you are stuffing, you can end the link you are working on, cut the casing (leave a tail so you can tie the end) and put your meat back in the freezer. I had to do this. It helps to work with smaller batches of meat – keep smaller piles in the freezer and take them out as you need them. If you have to pause, stick the stuffer part with the casing on it in some warm water so it doesn’t dry out as your meat cools down again.
-

- Grind your meat. Make your 10 year old daughter laugh with a ‘thumbs up’ when she says “smile!”
-

- These are hog casings. Enough to do 100lbs of meat. They are salted.
-
- This is what a portion looks like after it’s been soaked.
-

- Run a bubble of water through the casings to check for leaks.
-
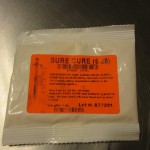
- Meat cure “Sure Cure” from my local butcher. It’s tinted pink so you dont mistake it as salt or sugar, as it can be poisonous when used incorrectly.
-

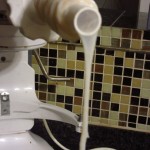
- Enter adorable meat-mixer.
-
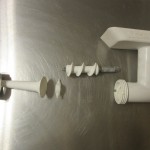
- These are the innards to the Kitchenaid stuffer.
-

- This is how it looks when it’s all put together.
-
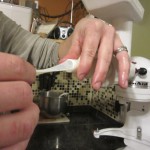
- Slide the casing on the tube.
-
- Leave a few inches hang off.
-

- Hold the casing and control how quickly if feeds off as you stuff.
-
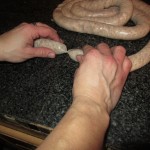
- Use the end of a clean pin or paper clip, poke any air bubbles you find. The casing will suck right down to the meat.
-

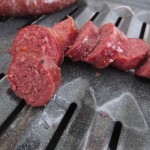
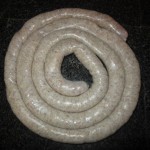
- Venison kielbasa
-
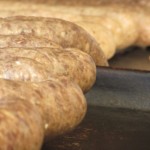
- Pork sausage
-
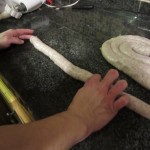
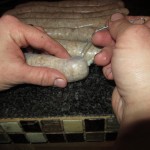
- Decide how long you want your links to be.
-
- Twist.
-
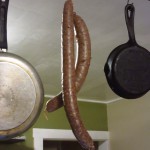
- Unconventional, but this works for air drying your casing.

-
- This is how it looks when the casing is dry to the touch.
I will share with you the venison and pork sausage recipes I used. If you wish to smoke your sausage, smoke them over wood chips of your choice – we used apple wood – to a temperature of 155F. Cool them in an ice bath to stop the cooking process and drop the temp down to 120F, then hang them to “bloom” or dry – about 2 or 3 hours. Then package for the fridge or freezer. It will last 3-4 days in your fridge, and 3+ months in your freezer.
Pork Sausage (smoked, this tastes just like the smoked sausage you buy in the grocery store)
This recipe starts at one pound. Multiply it for the quantity you wish to make. I had lean pork loin, and back fat from a hog that I mixed together. A butcher I spoke to suggested 10-20% fat content in your homemade sausage. Be sure to include the extra weight of the pork in your meat mixture and adjust your meat cure accordingly – the cure should be measured out to include both fat and lean meats – if you use 4lbs of meat and 1lb of fat, adjust your cure for 5lbs of meat total. Once mixed thoroughly, stuff your casings, squeeze and twist into links, and proceed to refrigerate, freeze, or smoke. You can safely refrigerate your meat overnight to smoke the next day. Freezing prior to smoking is not recommended, as freezing and time will reduce the effectiveness of the cure, and the smoking process is what you need the cure for, to keep your meat safe while it remains in the danger zone for bacteria to grow.
- 1lb ground, fatty pork (or 10-20% fat mixed in with lean meat)
- 1-1/2 tsp non-iodized salt
- 1/4 tsp pepper
- 1/4 tsp sugar
- 1/4 tsp marjoram
- 1/4 tsp meat cure such as Instacure #1, Sure Cure, etc.
- 1 clove garlic, minced
Method:
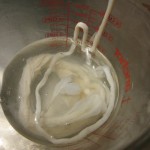
- Mix your meat and seasonings thoroughly.
- Assemble your meat stuffer and put the casing on the stuffer tube. To do this, find an end, open the hole and slide it onto the stuffer attachment. Continue sliding the casing on the tube until it is all on. Pull a few inches down but do not tie it – you can tie it once the sausage is stuffed. If you tie it before it starts being stuffed, you will have a big air bubble at the end, as air is pushed through the tube as the meat makes its way to it.
- As you turn your machine on and start feeding the meat through, keep one hand on the tube to control the speed at which the casing is filled. You don’t want them too loose or you may develop air pockets and weak looking links, but too stuffed can make linking them difficult and you risk breaking the casing. You get the hang of it pretty quick.
- Don’t worry about making links yet. That happens when you have finished stuffing the casing.
- Once done, pull the stuffed casing away from the tube and pull off a few inches of casing before cutting it, if you have extra casing on the tube. Tie both ends of the sausage. Then, begin making links. Decide how long you want each one to be, then twist the stuffed casing one complete turn at each link point.
- It is recommended that you hang your stuffed links until they become dry to the touch before smoking. If you are keeping your sausage fresh and uncooked, send it to the fridge or freezer.
Venison Kielbasa
This is a great way to use the fatty meat of your deer that you might otherwise feed to the dogs!
- 4lb venison, trimmed of silverskin
- 1lb pork fat
- 1c dry milk
- 3TB kosher salt
- 2ts. ground pepper
- 1 ts. marjoram
- 5-9 cloves of garlic, minced
- 1ts meat cure
- 1c ice cold water
- Mix your meat and seasonings thoroughly.
- Assemble your meat stuffer and put the casing on the stuffer tube. To do this, find an end, open the hole and slide it onto the stuffer attachment. Continue sliding the casing on the tube until it is all on. Pull a few inches down but do not tie it – you can tie it once the sausage is stuffed. If you tie it before it starts being stuffed, you will have a big air bubble at the end, as air is pushed through the tube as the meat makes its way to it.
- As you turn your machine on and start feeding the meat through, keep one hand on the tube to control the speed at which the casing is filled. You don’t want them too loose or you may develop air pockets and weak looking links, but too stuffed can make linking them difficult and you risk breaking the casing. You get the hang of it pretty quick.
- Don’t worry about making links yet. That happens when you have finished stuffing the casing.
- Once done, pull the stuffed casing away from the tube and pull off a few inches of casing before cutting it, if you have extra casing on the tube. Tie both ends of the sausage. Then, begin making links. Decide how long you want each one to be, then twist the stuffed casing one complete turn at each link point.
- It is recommended that you hang your stuffed links until they become dry to the touch before smoking. If you are keeping your sausage fresh and uncooked, send it to the fridge or freezer.
Here are the tools I use to do the job: